Blocking Unwanted Emails to Enter Salesforce Email to Case Service Address

Salesforce Email to Case provides a very important functionality to Salesforce Service Cloud. The ability to handle and automatically turn new emails into a case and add existing email threads to a pre-existing case. In order for this functionality to work the Salesforce needs to create a service address, this address is hosted by Salesforce and emails need to be forwarded from the email address(es) to the service address in order for Salesforce email to case to work. We will go through the process of setting up email to case and a forwarding rule for testing.
The main purpose of this article is for after the setup and testing and has to do with the security of the service address. The service address is created as a long string this is the address that is meant to have all emails from a given email to forward. If a bad actor got ahold of this email they could start sending emails to the service address and bypass the email address that is supposed to be doing the forwarding. This could clog up the cases and routing. Bad data/files could be inserted, if the email service has any type of scanner or retention mechanisms both of those would be bypassed. This article will focus on different ways to combat this issue with email to case service addresses. First we will setup E2C:
Setup Email to Case
To setup Email to Case for Salesforce you can either through the guided setup flow or set it up manually. We will be going through the manual process as the focus is around the email and routing address and not the full configuration of Email to Case.
First make sure you have enhanced emails turned on to create emails as Email Messages go to setup –> Enhanced Emails and make sure it is enabled.
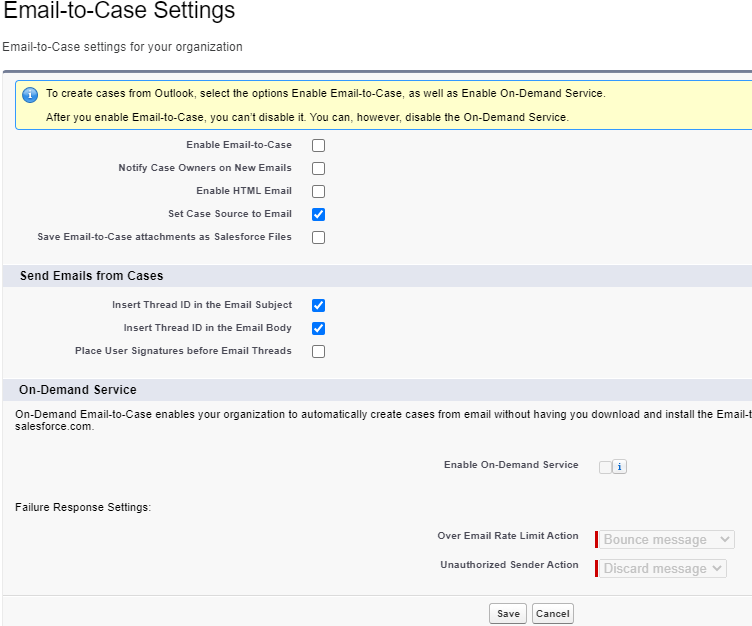
Next Go to setup –> Email-to-Case –> ‘Edit’ click ‘Enable Email to Case’ the ‘Enable On-Demand Service’
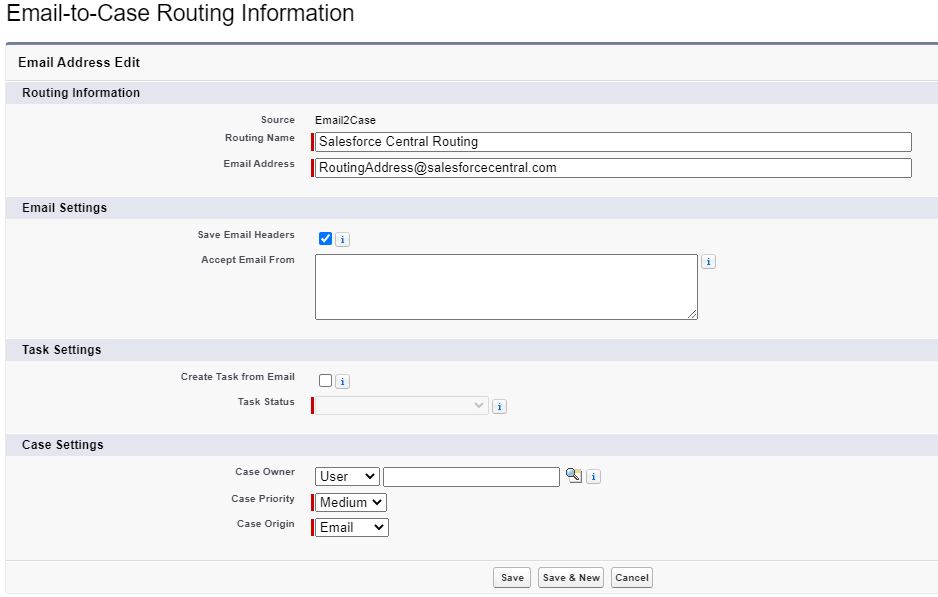
After saving click on ‘New’ underneath and next to Routing Address and fill out the necessary information along with clicking the checkbox for ‘Save HTML Headers’. The Headers are very important and we will come back to that later. The email provided for the routing information would be the actual email address you would want individuals to be sending you emails to. Later on you will need to forward the emails from the email address to the routing address that Salesforce creates.
Once you save, a routing address will be created. And an email will be sent to the email address with a link to verify. Copy the newly created routing address and while you are in your ESP forward your emails to the routing address. Now try a quick test send an email from another email address to the forwarding email and you should have a new case created in your org. Congrats! You just set up email to case in Salesforce! Now try another test from the second email that is not forwarding emails to the routing address try sending an email directly to the routing address. You will notice a new case is also created from that email as well. This is what we will work on preventing. Having either 1 email or a list of emails being able to create acceptable cases. And if any cases are created from other email address to either block or mark them for further investigation.
Identifying Unwanted Emails as Cases
Earlier in the article I referenced the checkbox ‘Save Email Headers’ this setting must be checked in order to prevent or investigate an email that was not sent from one of the forwarding addresses. When an email message is created the field ‘To Address’ will always be the routing address so in order to identify if the email was actually sent to the routing address we need to look at ‘Headers’ field. Each ESP will have different information in the header however the commonality is that if the email was sent to the forwarding email address first it will be in the header. If it was not the header won’t have the email address. I would suggest adding that field to the EmailMessage page layout and taking a look as to what is populated in the field.
Knowing that the Email to Case forwarding address would be in the header first create a custom metadata to create hold a list of the acceptable email addresses(I called it Email_to_Case_Email_Account__mdt). Then add a record with the label being the address for each email address. This leads to the first part of a trigger that can be used to identify any emails that were not sent from a forwarding address(es):
trigger EmailMessageTrigger on EmailMessage (before insert) {

    List<String> acceptableEmailsList = new List();
    for(Email_to_Case_Email_Account__mdt emailAct :[Select Label from Email_to_Case_Email_Account__mdt]){
        acceptableEmailsList.add(emailAct.Label);
    }
    Pattern p = Pattern.compile(String.join(acceptableEmailsList, '|'));// the | in regex acts as an OR

    Set<Id> caseIdSet = new Set();
    for(EmailMessage em :Trigger.New){
        if(!em.Incoming) continue;//this shouldn't fire on emails being sent out
        Boolean match = p.matcher(em.Headers).find();//you have to look at the header as the toAddress will be the routing address, to test send an email directly to the service address
In the above first part of the before insert trigger we have query the custom metadata type to hold the names of all the acceptable email addresses. Then we join the list of email addresses to create a regex pattern. Next loop through the list, check to see if the email sent is incoming(we only care about incoming emails not outgoing), and check to see if there is a match with the regex pattern.
Preventing Unwanted Emails as Cases
Now that the match has been found there are 2 things that we could do, 1 of which is to block the EmailMessage from being created and rollback the full transaction with the addError() method. Like so:
if(!match){
            em.addError('Email must be sent to: '+em.ToAddress);//addError will stop the transaction and rollback but will also send and email to the email address
        }
    }
}
The down side to this approach this will cause an error email to be sent to the email address that is sending the email directly to the email to case routing address.
Investigating Unwanted Emails as Cases
The alternative would be to create the Case and EmailMessage but mark the case to investigate where this email is coming from and why the case was created. You could create routing rules/alerts to make sure there is no disruption to the other email flows and the correct people are immediately notified.
if(!match){
            caseIdSet.add(em.ParentId);//alternative this would create an audit
        }
    }
    //Get list of bad cases and update the type value
    List auditCases = [Select Id, Type from Case where Id IN :caseIdSet];
    for(Case auditCase :auditCases){
        auditCase.Type = '***INVESTIGATE***';
    }
    update auditCases;
}
The above will instead of creating an error update the case type to ‘***INVESTIGATE***’ to form as an audit.
Salesforce Email to Case is a very important feature within Service Cloud. It provides the ability to create cases from an email address by creating a routing address to forward the emails to. However this creates a potential security flaw from an unwanted actor. By adding a few lines of code to a trigger we can strengthen the security and create a great feature for the business. The above could be created via a record trigger flow. The pattern and matcher could be a String.contains instead. Also the custom metadata could be a Map if you wanted specific routing addresses to only use specific forwarding emails.
Here is the Github repo.
Checkout My New Course:
Crush It As A Salesforce Developer: Mastering Apex

Test Your Knowledge:
Try the new Salesforce Developer Quiz