Accessing Salesforce with JWT OAuth Flow

Salesforce JWT OAuth flow allows the ability for one server to communicate with another server without the need for any user credentials. This flow is one of several other OAuth flows designed for accessing Salesforce through other applications. This article won’t be going through JWT tokens the structure and how they are created (this is a good start to learn about JSON Web Tokens and the Structure) but instead will be focusing on how to authenticate to Salesforce without any user credentials using the JWT OAuth flow. This flow is used for server to server communicate generally with no interactions involved with an individual. Later I will show how it would be possible but first will go over the flow itself, how to view and access the access token, and the how to use the token for later api calls. I will be demonstrating by using, OpenSSL (for private and public key generation), a Node.js Express server, Visual Studio Code, and Postman.
Salesforce JWT Bearer Flow
The below diagram depicts the actions taken between the requesting server, Salesforce’s authorization server, and Salesforce’s resource server:
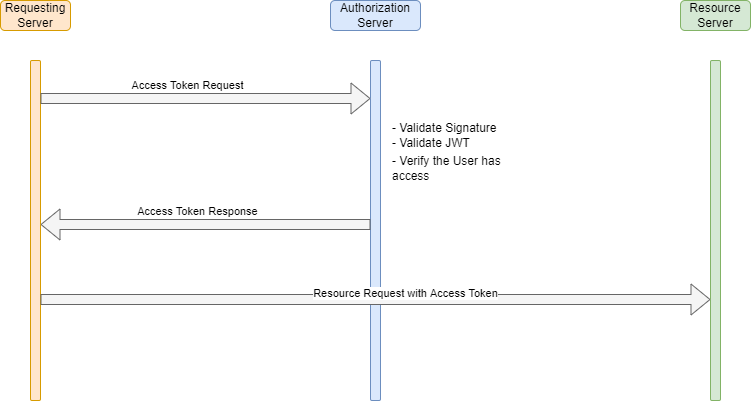
First the requesting server will create a JWT to request the access token. Salesforce will validate the JWT, verify the user has access to Salesforce, create a session, and send the access token back to the requesting server. Once the requesting server has the access token that token can be used in the Header to request the necessary resources it requires. The token will take the permissions of the user specified in the JWT (generally an integration user record). Now we will go through the Salesforce configuration settings needed to be made and then test that we can get an access token.
Setting up Salesforce for JWT
The first thing that needs to be done is a public certificate and private key pair needs to be created. This can be done by following the instructions in the Salesforce Developer documents and doing the following in the terminal:
Create Private Key
openssl genrsa -des3 -passout pass:SomePassword -out server.pass.key 2048openssl rsa -passin pass:SomePassword -in server.pass.key -out server.keyCreate Certificate
openssl req -new -key server.key -out server.csrCreate Public Certificate
openssl x509 -req -sha256 -days 365 -in server.csr -signkey server.key -out server.crt
The public certificate will be used in the next step with the connected app and the private key will be used in the node application.
Create Connected App
In order for Salesforce to authorize a User access with a JWT a connected app will need to be created. Connected Apps are used to allow external integrations to integrate with Salesforce through a set of standard protocols. Go to Setup –> App Manager –> In the top right click New Connected App and fill out the following making sure ‘Enable OAuth Settings’ and ‘Use Digital Signatures’ are checked and add upload the server.crt file:

The callback URL is not used in this flow but is required. Next we need to manage the connected app and add the correct profile or permission set for the user record to be able to log in. Next click on ‘Manage’:

Then click on ‘Edit Policies’:

Now go to OAuth Policies –> Permitted Users:

Next add the Profile/Permission Set to identify the user/set of users you would like to log in to Salesforce via the JWT OAuth Flow:

Now that we have the connected app created and the user assigned to the app we can go update the node.js code.
Update Node Server
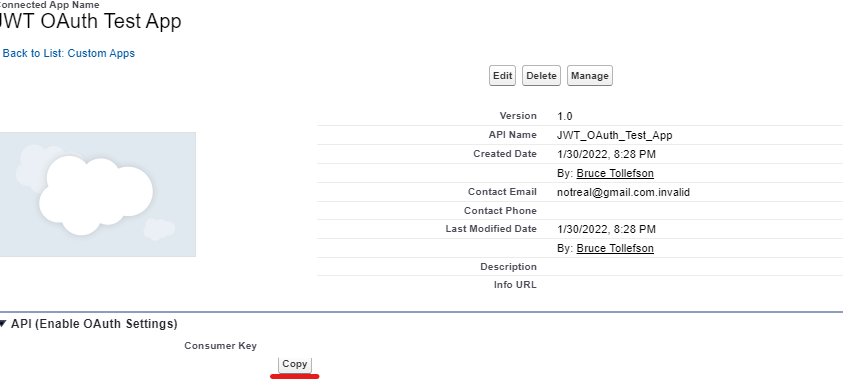
I want this to focus more on the Salesforce aspect so I created a Github repo for the node server. However we will still need to update a few parts of it. After pulling done the code and opening it in Visual Studio Code (you can use other text editors or IDEs but I won’t be going through how to start the process of starting) go to the config folder –> default.json and update the “client_id” to the connected app client Id. You can find the connected app client id by viewing the connected app and copying the ‘Consumer Key’:
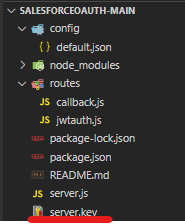
Add the server.key private key file that was created earlier in the same folder that has the node server.js file:
Now in the terminal type:
node server.jsOnce started the message ‘Server started on PORT: 5000‘ will output. We have just started a server with an api that is running on port 5000. To access this we will send a POST request to the localhost endpoint with Postman.
Setup Postman
Assuming you have Postman installed and the server is still running it is time to hit the server endpoint which will create a JWT and send it to Salesforce. In Postman create a POST request with the following endpoint(localhost:5000/api/jwtauth) and JSON body:
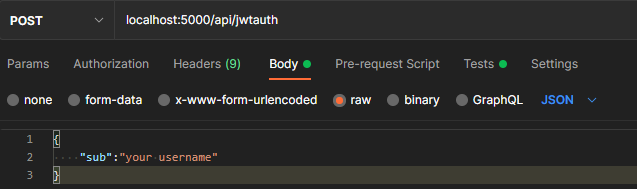
Update the JSON “sub” with the username you would like to log in as. After clicking send you will recieve a response with the access_token, scopes, instance_url, id, and token_type. BOOM! You have now setup and tested Salesforce to log in as a given user using the JWT OAuth Flow. Hopefully this gives a better idea of the JWT OAuth Flow with Salesforce and how it can be used with an external server to log in to Salesforce.
Extra
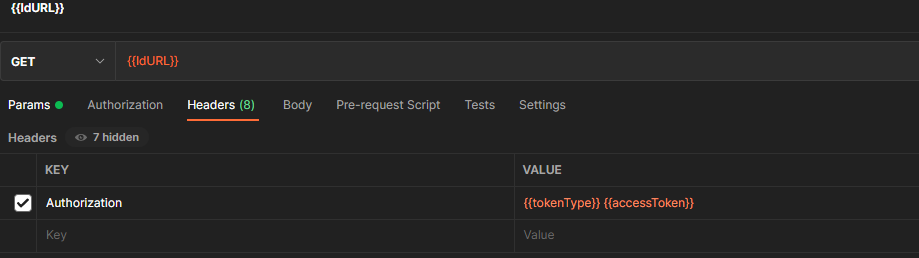
A couple of added items if you would like to verify the user that you have logged in as you can access the id URL in the response to see who the token belongs to. For this we will create an environment in Postman and assign variables so you can use them in other API calls if you would like to explore other Salesforce REST APIs.
First in Postman go to file New –> ‘Environment’ put in the following:
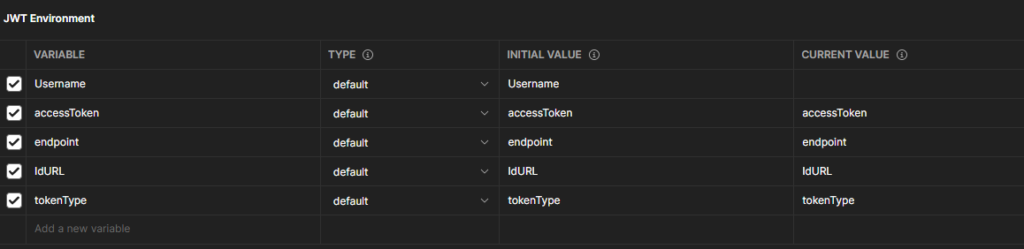
Username can be optional if you would like to leave it out or update it and change the JWT api POST body. Save and next add the following in the localhost ‘Tests’ tab:
let jsonData = pm.response.json();
pm.environment.set("accessToken", jsonData.access_token);
pm.environment.set("endpoint", jsonData.instance_url);
pm.environment.set("IdURL", jsonData.id);
pm.environment.set("tokenType", jsonData.token_type);
Now you can make a callout to see the user that the access token belongs to with the following:
Generally this flow is used for integration/service account type users where there is no interaction to the UI and it is another system. However it can be used to create access tokens for other users that are assigned to the connected app.
From a security standpoint the most valuable thing is the private key, in this instance the server.key file. As you can see this flow does not use username and password. Instead the key is used to create the token and the certificate is used to validate it. All the trust is on the holder of the key file.
Checkout My New Course:
Crush It As A Salesforce Developer: Mastering Apex

Test Your Knowledge:
Try the new Salesforce Developer Quiz